多线程基础
多线程基础,线程的创建、启动、停止,线程状态,wait、notify 等。
多线程基础
有多少种实现线程的办法?
官方文档为 2 种, 参考连接:https://docs.oracle.com/javase/8/docs/api/java/lang/Thread.html
方法 1: 继承 Thread 类
There are two ways to create a new thread of execution. One is to declare a class to be a subclass of
Thread. This subclass should override therunmethod of classThread. An instance of the subclass can then be allocated and started.大意:有两种方法可以创建新的执行线程。一个是声明一个类为
Thread的子类。此子类应覆盖类Thread的run方法。然后可以分配并启动子类的实例。
Demo:
public class MyThread extends Thread {

    private String name;

    public MyThread(String name) {
        this.name = name;
    }

    @Override
    public void run() {
        for (int i = 0; i < 1000; i++) {
            System.out.println(name + ":" + i);
        }
    }
}
方法 2:实现 Runnable 接口( 推荐 )
The other way to create a thread is to declare a class that implements the
Runnableinterface. That class then implements therunmethod. An instance of the class can then be allocated, passed as an argument when creatingThread, and started.大意:创建线程的另一种方法是声明一个实现“可执行”接口的类。然后,该类实现“运行”方法。然后可以分配类的实例,在创建“线程”时作为参数传递,然后再开始。
Demo:
public class MyRunnable implements Runnable {

    private String name;

    public MyRunnable(String name) {
        this.name = name;
    }

    @Override
    public void run() {
        for (int i = 0; i < 1000; i++) {
            System.out.println(name + ":" + i);
        }
    }
}
为什么推荐使用 Runnable 接口,好在哪里?
继承 Thread 类是不推荐的 🚨,因为它有以下的一些缺点:
- 从代码架构角度:具体的任务(run 方法)应该和 “创建和运行线程的机制(Thread 类)” 解耦,用 runnable 对象可以实现解耦。
- 使用继承 Thread 的方式的话,那么每次想新建一个任务,只能新建一个独立的线程,而这样做的损耗会比较大(比如重头开始创建一个线程、执行完毕以后再销毁等。如果线程的实际工作内容,也就是 run() 函数里只是简单的打印一行文字的话,那么可能线程的实际工作内容还不如损耗来的大)。如果使用 Runnable 和线程池,就可以大大减小这样的损耗。
- 继承 Thread 类以后,由于 Java 语言不支持双继承,这样就无法再继承其他的类,限制了可扩展性。
通常我们优先选择 Runnable。
继承 Thread 和实现 Runnable 两种方法的本质对比
“实现 Runnable 接口并传入 Thread 类” 和 “继承 Thread 类然后重写 run()” 它俩在实现多线程的 本质上,并没有区别,都是最终调用了 start () 方法来新建线程。
它们之间的最主要区别在于 run() 方法的内容来源:
@Override
public void run() {
    if (target != null) {
        target.run();
    }
}
Runnable :最终调用 target.run();
Thread:run() 整个被重写
小问题:同时传入 Runnable 对象和重写 Thread run 方法,会怎么样?
    public static void main(String[] args) {
        new Thread(new Runnable() {
            @Override
            public void run() {
                System.out.println("Hello, this is Runnable.");
            }
        }) {
            @Override
            public void run() {
                System.out.println("Hello, this is Thread.");
            }
        }.start();
    }
控制会打印:Hello, this is Thread.
分析: 其实参考前文 run 方法来源那里,就可以得出
@Override
public void run() {
    if (target != null) {
        target.run();
    }
}
给了 Runnable,target 就不为空,正常要执行 Runnable 的 run 方法,但是后面又将 Thread 的 run 方法重写了,这 Runnable 的不就没用了嘛 ~
总结
- 我们只能通过新建 Thread 类这一种方式来创建线程,但是类里面的 run 方法有两种方式来实现,第一种是重写 run 方法,第二种实现 Runnable 接口的 run 方法,然后再把该 runnable 实例传给 Thread 类。除此之外,从表面上看线程池、定时器等工具类也可以创建线程,但是它们的本质都逃不出刚才所说的范围。
- 还有其他的实现线程的方法,例如线程池等,它们也能新建线程,但是细看源码,从没有逃出过本质,也就是实现 Runnable 接口和继承 Thread 类(线程池以后再说)。
启动线程的方式
start() 方法
注意点:
- start 方法是被 synchronized 修饰的方法,可以保证线程安全;
- 由 JVM 创建的 main 方法线程和 system 组线程,并不会通过 start 来启动。
正确停止线程方法
使用 interrupt() 方法
Thread thread = new Thread(runnable);
thread.start();
// 调用 interrupt() 发送中断信号
thread.interrupt();
处理中断的方法
⚠️ 不建议在底层 try-catch ,如下:
public class WrongWayStopInProd implements Runnable {

    @Override
    public void run() {
       // 线程未中断时进入
        while (true && !Thread.currentThread().isInterrupted()) {
            System.out.println("go...");
            throwExceptionInMethod();
        }
    }

    // 使用 try-catch!会导致中断失效
    private void throwExceptionInMethod() {
        try {
            // 睡 3 秒,确保子线程方法依然在运行期间,接收到 interrupte 信号
            Thread.sleep(3000);
        } catch (InterruptedException e) {
          // 这里 catch 后没有做任何其他处理,则上述 run 方法会继续执行
            e.printStackTrace();
        }
    }

    public static void main(String[] args) throws InterruptedException {
        Thread thread = new Thread(new WrongWayStopInProd());
        thread.start();
        // 主线程睡 1 秒
        Thread.sleep(1000);
        thread.interrupt();
    }

}
上述代码中 throwExceptionInMethod 方法里将中断异常捕获后,虽然会打印出异常信息,但没有做其他处理,同时呢也清除了通知中断的标记位,即:线程就从中断又变成了未中断,也就是 !Thread.currentThread().isInterrupted() 条件依然成立! 会导致 WrongWayStopInProd 的 run 方法继续运行,while 将继续循环,整个程序也并没有结束退出,所以在控制台会看到如下的信息:
go...
// 打印异常
java.lang.InterruptedException: sleep interrupted
    at java.lang.Thread.sleep(Native Method)
    at
 com.interview.javabasic.thread.stop.WrongWayStopInProd.throwExceptionInMethod(WrongWayStopInProd.java:19)
    at com.interview.javabasic.thread.stop.WrongWayStopInProd.run(WrongWayStopInProd.java:12)
    at java.lang.Thread.run(Thread.java:750)
// 程序继续运行,并持续打印 go...
go...
go...
go...
// 省略...
提示:com.interview.javabasic.thread.stop 是我的包名
坏处:
-
想象一下,采用这样处理,生产环境中,大量日志会持续滚动,抛了错误都看不到~
-
另外一方面,假如 throwExceptionInMethod 方法是其他人写的功能,调用方(这里是
run方法)调用你的方法需要根据不同情况做不同的处理,现在异常在 throwExceptionInMethod 里出错,调用方也不知道,就没办法做不同的处理了,就很夸张了!
推荐处理中断的最好方法👍
优先选择在方法上抛出异常
用 throws InterruptedException 标记你的方法,不采用 try 语句块捕获异常,以便于该异常可以传递到顶层,让 run 方法可以捕获这一异常。
由于 run 方法内无法抛出 checked Exception(只能用 try catch),顶层方法必须处理该异常,避免了漏掉或者被吞掉的情况,增强了代码的健壮性。
我们将上述代码调整后如下:
    @Override
    public void run() {
        while (true && !Thread.currentThread().isInterrupted()) {
            System.out.println("go...");
            try {
                throwExceptionInMethod();
            } catch (InterruptedException e) {
                // 这里可以进行 保存日志、停止程序 操作
                System.out.println("保存日志......");
                e.printStackTrace();
            }
        }
    }

    // 在此方法签名上抛出异常,以便上述 run 方法中去处理!
    private void throwExceptionInMethod() throws InterruptedException {
        // 睡 3 秒,确保子线程方法依然在运行期间,接收到 interrupte 信号
        Thread.sleep(3000);
    }

    public static void main(String[] args) throws InterruptedException {
        Thread thread = new Thread(new RightWayStopInProd());
        thread.start();
        // 主线程睡 1 秒
        Thread.sleep(1000);
        thread.interrupt();
    }
这样调整后的好处
- 调用方(这里是
run方法)调用方法的时候可以明确知道会有异常抛出,可以针对性处理,记录日志等。 - 同样,调用方获取到异常后,也可以根据自身业务逻辑需要去觉得是否要继续执行自己的代码。
Interrupt 中断常用方法
先看一个代码,猜猜结果!
public static void main(String[] args) throws InterruptedException {
    Thread threadOne = new Thread(new Runnable() {
        @Override
                    public void run() {
            for (; ; ) {
            }
        }
    }
    );
    // 启动线程
    threadOne.start();
    //设置中断标志
    threadOne.interrupt();
    //获取中断标志
    System.out.println("threadOne.isInterrupted(): " + threadOne.isInterrupted());
    //获取中断标志并重置
    System.out.println("threadOne.interrupted(): " + threadOne.interrupted());
    //获取中断标志并重置
    System.out.println("Thread.interrupted(): " + Thread.interrupted());
    //获取中断标志
    System.out.println("threadOne.isInterrupted(): " + threadOne.isInterrupted());
  // 利用 join 让主线程等待其余线程结束(join 的知识点在下面会讲)
    threadOne.join();
    System.out.println("Main thread is over.");
}
分析结果:
threadOne.interrupt();中断threadOne.isInterrupted();获取中断状态:truethreadOne.interrupted();注意:interrupted()为静态方法,该方法的作用对象是当前调用它的线程,也就是上述代码中的 主线程 ! 所以threadOne.interrupted()是获取 主线程中断标志,那么结果肯定是: falseThread.interrupted();同理,也是上述代码中的 主线程 ,所以结果也是:falsethreadOne.isInterrupted()由于上述 3、4 步骤实际并不会影响 threadOne, 所以最后再查询一遍threadOne的线程中断状态, 结果依然是 true
所以最终结果:true、false、false、true
线程状态
NEW :新建,创建后尚未启动,也就是还没有调用 start () 方法。
RUNNABLE :可运行,可能正在运行,也可能正在等待 CPU 时间片(操作系统线程状态中的 Running 和 Ready 在 Java 中均叫 RUNNABLE)。
BLOCKED :阻塞,实际在等待获取一个排它锁(仅针对 Synchronized 环境下才有该状态),如果其线程释放了锁就会结束此状态。
WAITING :无限期等待,进入该状态的线程需要等待其他线程做出一些特定动作,比如唤醒、中断等通知。
TIMED_WAITING :处于这种状态的线程不会被分配 CPU 执行时间,不过无需无限期等待被其他线程显示地唤醒,在达到一定时间后它们会自动唤醒。
TERMINATED :线程继续运行执行结束或执行过程中因异常意外终止都会使线程进入终止状态。线程一旦终止,就不能复生,这是不可逆的过程。
状态转化图

线程中重要的方法
Object 中的 wait()、notify()、notifyAll()wait()、notify()、notifyAll() 是锁级别的操作,作用于对象,所有的类都继承 Object 类,所以这些方法放在 Object 类中。
其次,wait()、notify()、notifyAll() 作用于同一个对象的 Monitor 锁! 也就是不同对象的 wait、notify 是对其他对象不影响的。
public class NofityAll implements Runnable {

   /**
     * 资源
     */
    private static final Object resource = new Object();

    @Override
    public void run() {
        synchronized (resource) {
            System.out.println(Thread.currentThread().getName() + " get resource lock.");

            try {
                resource.wait();
            } catch (InterruptedException e) {
                throw new RuntimeException(e);
            }
            System.out.println(Thread.currentThread().getName() + " 's waiting to end.");
        }
    }

    public static void main(String[] args) throws InterruptedException {
        NofityAll nofityAll = new NofityAll();
        Thread t1 = new Thread(nofityAll);
        Thread t2 = new Thread(nofityAll);

        Thread t3 = new Thread(() -> {
            synchronized (resource) {
                System.out.println(Thread.currentThread().getName() + "CCCCC get resource lock.");
              // 通知所有
                resource.notifyAll();
                System.out.println(Thread.currentThread().getName() + "CCCC notified.");
            }
        });

        t1.start();
        t2.start();
        Thread.sleep(200);
        t3.start();
    }

}
解释:首先我们创建了 3 个线程,均去操作同一个 resource 对象资源!
3 个线程分别是 t1、t2、t3,我们定义她们启动的顺序,是 t1/t2 ,然后是 t3, 虽然代码中 t1 先 start ,但是并不代表 t1 一定先执行,但是执行 t3 前,我们让线程 sleep(200) ,所以保证 t3 最后执行。
最终我们是 t1、t2 线程是用来模拟 waiting 状态;t3 是用来唤醒
Thread-0 get resource lock.
Thread-1 get resource lock.
Thread-2CCCCC get resource lock.
Thread-2CCCC notified.
Thread-1 's waiting to end.
Thread-0 's waiting to end.
假如我们的线程先后顺序是这样的: t1→t2→t3,那么情况如下:
- t1 抢先到
resource的 monitor 锁,那么将打印:Thread-0 get resource lock.,此时 t2 是拿不到锁的; - 紧接着 t1 线程中执行
resource.wait();t1 释放了 monitor 锁,此时 t2 获得了resource的 monitor 锁,那么将打印:Thread-1 get resource lock.; - 紧接着 t2 线程中执行
resource.wait();t2 释放了 monitor 锁,此时 t1、t2 都处于 WAITING 状态; - 然后线程 t3 线程执行,那么将打印:
Thread-2 CCCCC get resource lock. - 紧接着 t3 线程中执行
resource.notifyAll();唤醒所有线程,即唤醒 t1、t2 线程,同时 t3 线程继续执行至完成,即打印:Thread-2CCCC notified. - 然后 t1、t2 重新竞争
resource的 monitor 锁; - 假如 t2 抢到锁,那么将打印:
Thread-1 's waiting to end.,t2 线程执行完毕; - 然后是 t1 抢到锁,将打印:
Thread-0 's waiting to end.,t1 线程执行完毕;
wait 原理
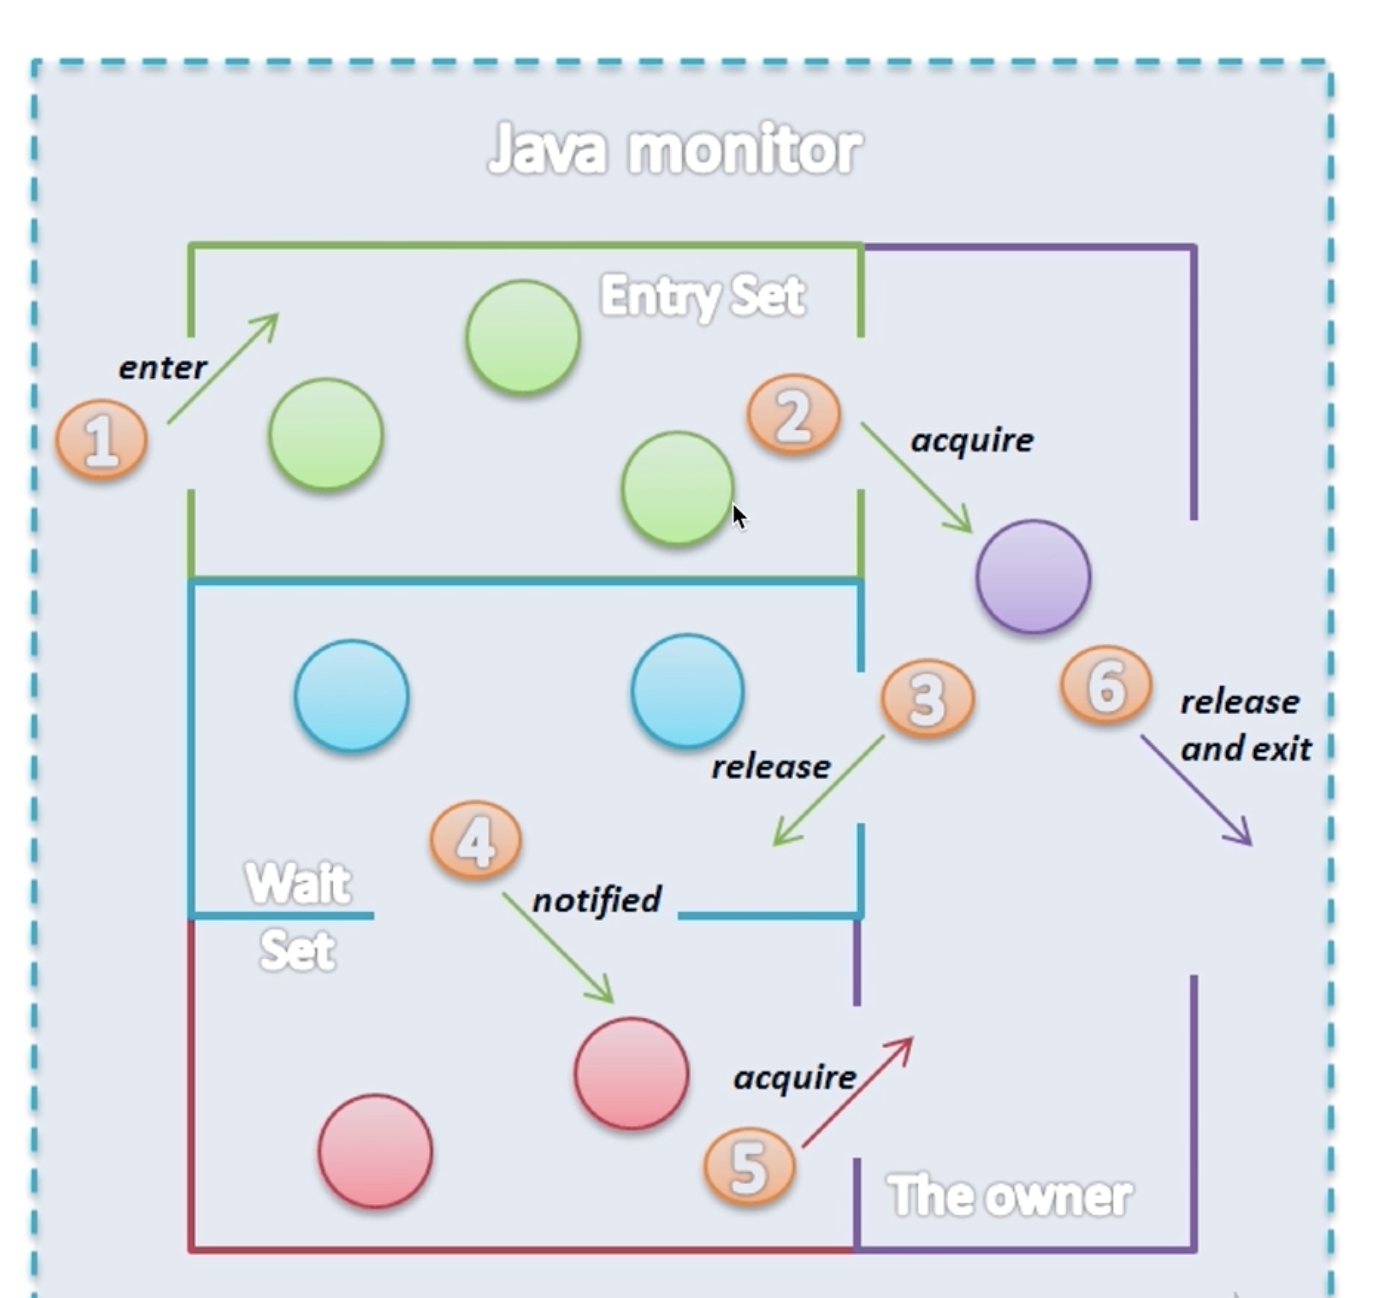
- 首先从入口集 Entry Set 开始去获取锁 🟢
- 获得了锁 🟣
- 执行 wait 方法释放锁进入 Wait Set 🔵(其实粉球部分也可以理解为绿色部分
EntrySet) - 被唤醒时开始尝试获取锁 (线程的状态从
waiting变成blocked) 👛 - 获得锁 (抢到锁后变成
runnable) 🟣 - 执行完毕释放锁
用 wait()、notify() 实现 生产者消费者模式
举个例子:
数据存储仓库最大容量 10,生产者往仓库添加 100 条数据,消费者从仓库消费 100 条数据;
若仓库达到最大容量,则生产者暂停生产,并等待消费者消费,等有空余继续生产;
若仓库达到最小容量,即为空,则消费者暂停消费,并等待生产者生产,等有数据了继续消费;
生产者只要有生产数据,就通知消费者消费;
消费者只要消费了数据,就通知生产者生产;
代码实现:
/**
 * ProducerConsumerModelDemo 使用 wait() 、notify() 实现生产者、消费者模式
 *
 * @author suremotoo
 * @date 2022/11/03 16:26
 */
public class ProducerConsumerModelDemo {

    public static void main(String[] args) {
        EventStorage storage = new EventStorage();
        Producer producer = new Producer(storage);
        Consumer consumer = new Consumer(storage);
        new Thread(producer).start();
        new Thread(consumer).start();
    }

}

/**
 * 定义数据存储资源
 */
class EventStorage {

    private int maxSize;
    private LinkedList<Date> storage;

    public EventStorage() {
        maxSize = 10;
        storage = new LinkedList<>();
    }

    /**
     * 存放数据
     */
    public synchronized void put() {
        // 如果已经达到最大数量,则暂停生产,等待消费者消费... ...
        while (maxSize == storage.size()) {
            try {
                wait();
            } catch (InterruptedException e) {
                throw new RuntimeException(e);
            }
        }
        storage.add(new Date());
        System.out.println("storage 新生产了数据,现在有:" + storage.size() + " 个数据.");
        // 通知消费者消费
        notify();
    }

    /**
     * 取出数据
     */
    public synchronized void take() {
        // 如果已经没有数据了,则暂停消费,等待生产者生产... ...
        while (0 == storage.size()) {
            try {
                wait();
            } catch (InterruptedException e) {
                throw new RuntimeException(e);
            }
        }

        System.out.println("消费者消费了数据: " + storage.poll() + " storage 还剩: " + storage.size());
        // 通知生产者继续生产
        notify();
    }

}

/**
 * 生产者
 */
class Producer implements Runnable {
    private EventStorage storage;

    public Producer(EventStorage storage) {
        this.storage = storage;
    }

    @Override
    public void run() {
        for (int i = 0; i < 100; i++) {
            storage.put();
        }
    }
}

/**
 * 消费者
 */
class Consumer implements Runnable {
    private EventStorage storage;

    public Consumer(EventStorage storage) {
        this.storage = storage;
    }

    @Override
    public void run() {
        for (int i = 0; i < 100; i++) {
            storage.take();
        }
    }
}
运行效果图:

实际运行代码,我们会发现,可能是一次性生产 10 个,一次性消费 10 个这样的结果(绿色框),也可能是 消费者消费了部分数据,生产者又继续生产,又或者是生产者生产了部分数据就被消费者拿去消费(红色框)。
关于 wait 和 notify 的详情解释
谁调用的 wait(),就是谁在等;谁调用的 notify(),就是谁在喊人。
在上述代码中,虽然是在 storage 这个对象里调用的 wati(), 也就是 storage.wait() 或者 this.wati(),但 并不是 storage 这个对象在等。
真正等待(挂起)的是 “执行这行代码的那个线程”,也就是 Producer 线程 或 Consumer 线程。
为了更好理解,我们用角色扮演的例子来说明:
1. 角色
- 场地(锁/Monitor):
storage对象。
- 它是线程休息和通讯的 地点,它不会动,它只是提供一个“等待室(Wait Set)”。
- 生产者线程(Producer Thread):
- 当它发现
storage满了,也就是它不用继续生产了,所以它会调用storage.wait()。 - 结果就是:生产者线程 释放锁,进入
storage的等待室睡觉,等有空位置了再继续生产。
- 消费者线程(Consumer Thread):
- 当它发现
storage空了,也就是它不用继续消费了,它会调用storage.wait()。 - 结果:消费者线程 释放锁,进入
storage的等待室睡觉。
2. 场景演示
我们用上面的角色,完整的走一下场景,假设 storage 大小只有 1。
场景一:消费者想取数据,但仓库是空的
- Consumer 线程 抢到了
storage的锁,进入get()方法。 - 判断发现
size == 0(空的)。 - Consumer 线程 执行
wait()。
并不是 storage 在等,而是 Consumer 线程 等,它立即暂停执行,并主动释放已持有的锁,随后进入 storage 对象的等待队列中“挂起”。
场景二:生产者生产了一个数据
- Producer 线程 抢到了
storage的锁(因为 Consumer 刚才释放了)。 - 执行
put(),放入一个数据。 - Producer 线程 执行
notify()。
Producer 线程 发出一个信号,告诉 storage 的等待队列:“可以醒一个了”。此时,刚才挂起的 Consumer 线程 被唤醒,重新进入锁的争抢状态。
Tip
这里的逻辑要理解清楚,这样后续的 join 方法也就好理解了!
用两个线程交替打印 0~100 的奇偶数
先解题:
打印 0~100 的奇偶数,2 个线程交替打印,也就是 1 个线程打印奇数、 1 个线程打印偶数。
方案一:仅用 synchronized 实现
 /**
 * ThreadPrintNumQuestion 用两个线程交替打印 0~100 的奇偶数,仅用 synchronized 实现
 *
 * @author suremotoo
 * @date 2022/11/03 20:21
 */
public class ThreadPrintNumQuestionOne {

    public static int count = 0;

    public static Object lock = new Object();

    public static void main(String[] args) {
        new Thread(() -> {
            while (count <= 100) {
                synchronized (lock) {
                    if (count <= 100 && (count & 1) == 0) {
                        System.out.println(Thread.currentThread().getName() + " 偶数:" + count++);
                    }
                }
            }
        }).start();

        new Thread(() -> {
            while (count <= 100) {
                synchronized (lock) {
                    if (count <= 100 && (count & 1) == 1) {
                        System.out.println(Thread.currentThread().getName() + " 奇数:" + count++);
                    }
                }
            }
        }).start();
    }

}
代码说明:
用两个线程,分别打印奇偶数,定义 1 个 count 变量,用来记录打印的数字,再定义一个 Object ,充当 lock 用来控制两个线程打印。
我们先定义 1 个循环 打印偶数的线程,只要 count <= 100 条件满足,就用 synchronized 锁住 lock,来防止打印奇数的线程打印,这样才能保证数字的顺序!然后 count 满足偶数条件,就打印当前 count,并将 count + 1;
同理,定义 1 个循环 打印奇数的线程,只要 count <= 100 条件满足,就用 synchronized 锁住 lock,来防止打印偶数的线程打印,只是判断 count 满足奇数条件,就打印当前 count,并将 count + 1;
假如刚开始 count 是 0,且进入打印偶数线程处理,最终肯定是会打印出来 0 的,count 并变为 1,
而 1 满足 while 循环条件,那么又进入 if 条件,此时不满足 if 条件,则不会进行 count++ , 所以就会再次释放 synchronized 锁,由打印奇数的线程去抢 synchronized 锁,假如还是偶数线程抢到了,那么依然不会进行 count++ ,再次释放锁,直到打印奇数的线程抢到锁,并打印出 1... 以此类推,所以功能实现上没问题,只是就浪费太多资源,效率比较低了!
Tip
小提示 1:
之所在判断奇偶数的时候,同时再判断一遍 count <= 100,是因为我们的 synchronized 是在 while (count <= 100) 里面,是为了解决出现这样一个情况:
假如 count 当前是 100,而此时打印奇数、偶数的两个线程都满足各 while (count <= 100) 条件,都进入到抢 synchronized 锁,100 那么最终会进入打印 偶数 的线程,而打印奇数的线程就会被阻塞等待,打印偶数的线程打印完 100 后 count+1 ,count 变成了 101,然后轮到打印奇数线程进入 synchronized,如果不再判断一次 count <= 100, 那么 101 满足奇数条件,肯定会打印出 101,这时候就不对了!
Tip
小提示 2:
count & 1 位运算,比 % 效率高!
缺点:
1:需要多次判断 count ,效率低
2:当前奇/偶线程不满足本身该处理的数据的时候,要一直重复进行锁竞争,抢到锁的线程也不一定是满足打印数字的线程,效率更是大大折扣。
方案二:使用 wait()、notify()、synchronized 配合实现
由于前面的提到的缺点,尤其是第二个缺点,既然是一个线程负责一种数据的处理,不妨按照这样的思路处理:
打印偶数的线程打印完,下一个数就通知打印奇数的线程处理,自己等待下次被唤醒;
打印奇数的线程打印完,下一个数就通知打印偶数的线程处理,自己也等待下次被唤醒;
代码如下:
/**
 * ThreadPrintNumQuestionTwo 用两个线程交替打印 0~100 的奇偶数,notify  wait 实现
 *
 * @author suremotoo
 * @date 2022/11/03 20:45
 */
public class ThreadPrintNumQuestionTwo {

    public static int count = 0;

    public static Object lock = new Object();

    static class TurningRunner implements Runnable {

        @Override
        public void run() {
            while (count <= 100) {
                synchronized (lock) {
                    System.out.println(Thread.currentThread().getName() + " " + count++);
                    lock.notify();
                    if (count <= 100) {
                        try {
                            lock.wait();
                        } catch (InterruptedException e) {
                            throw new RuntimeException(e);
                        }
                    }
                }
            }
        }

    }

    public static void main(String[] args) throws InterruptedException {
        TurningRunner runner = new TurningRunner();
        new Thread(runner, "偶数").start();
        // 小睡一会,确保让偶数线程先执行
        Thread.sleep(100);
        new Thread(runner, "奇数").start();
    }

}
各种小题
为什么 wait()、notify()、notifyAll() 这些需要在 同步代码块 中?sleep() 却不需要?
答:主要是为了保证通信可靠,防止死锁。
如果不在同步代码块中,在执行 wait () 之前,线程突然切换至其他 notify 的地方,这样把 notify 的代码都执行完成了,然后回到 wait() 这里执行了 wait 方法,然后再也没有其他线程可以来唤醒它, 它就会永久等待下去,造成死锁。
sleep() 本身是针对当前线程的,对其他线程关系并不大。
为什么 wait()、notify()、notifyAll() 这些方法定义在 Object 类 中?sleep() 却定义在 Thread 类 中?
答:本文之前已经简单解释过一次,wait()、notify()、notifyAll() 是锁级别的操作,作用于对象的,所有的类都继承 Object 类,所以这些方法放在 Object 类中。
其次,wait()、notify()、notifyAll() 作用于 同一个对象 的 Monitor 锁!,也就是不同对象的 wait、notify 是对其他对象不影响的。
反过来思考,也经常会遇到一个线程会持有多个锁,并且这些锁需要相互配合,如果将 wait()、notify()、notifyAll() 这些方法都放入 Thread 类中,就极大的降低了灵活性。
sleep() 方法
sleep 用法
Thread.sleep(millis) // millis 为毫秒
TimeUnit.单位.sleep(timeout) // timeout 为具体的时间数字,比如,2、3 什么的。
比如:TimeUnit.SECONDS.sleep(3); 就是睡眠 3 秒
TimeUnit.HOURS.sleep(3); 就是睡眠 3 个小时
当然也有 MINUTES、DAYS 等等,这种写法更优雅,也容易理解,要是睡眠长一点也能快速编写,用 Thread.sleep() 还转换为毫秒。
另外 Thread.sleep(millis) 的 millis 如果小于 0 会抛出异常,而 TimeUnit 的方式不会抛异。
总结一句话:
sleep 方法可以让线程进入 Timed_Waiting 状态,并且不占用 CPU 资源,但是不释放锁,直到规定时间后再执行,休眠期间如果被中断,会抛出异常并清除中断状态。
join() 方法
join 方法允许一个线程等待另一个线程完成。
如果 t 是其线程当前正在执行的 Thread 对象,执行 t.join(); 代码会导致当前线程暂停执行,直到 t 的线程终止。
参考官方链接:https://docs.oracle.com/javase/tutorial/essential/concurrency/join.html
join 用法
描述有点绕,看看例子就知道了!
先看一个例子,不使用 join 的情况:
public class JoinDemo {
    public static void main(String[] args) {
        System.out.println("main 主线程 开始...");
        Thread subThread = new Thread(() -> {
            System.out.println("subThread 子线程沉睡 3 秒");
            try {
                TimeUnit.SECONDS.sleep(3);
            } catch (InterruptedException e) {
                throw new RuntimeException(e);
            }
            System.out.println("subThread 子线程沉睡 3 秒结束");
        });
        subThread.start();
        System.out.println("main 主线程 结束...");
    }
}
console 打印结果
main 主线程 开始...
main 主线程 结束...
subThread 子线程沉睡 3 秒
subThread 子线程沉睡 3 秒结束
由于 subThread 这个子线程执行时间较长,所以 main 主线程 会先执行完打印出 main 主线程 结束..., 最后才会打印出 subThread 子线程沉睡 3 秒结束 的信息。
现在,再上述例子中,加入使用 join 后的代码如下:
public class JoinDemo {
    public static void main(String[] args) {
        System.out.println("main 主线程 开始...");
        Thread subThread = new Thread(() -> {
            System.out.println("subThread 子线程沉睡 3 秒");
            try {
                TimeUnit.SECONDS.sleep(3);
            } catch (InterruptedException e) {
                throw new RuntimeException(e);
            }
            System.out.println("subThread 子线程沉睡 3 秒结束");
        });
        subThread.start();
        try {
            // 这里 subThread join
            subThread.join();
        } catch (InterruptedException e) {
            throw new RuntimeException(e);
        }
        System.out.println("main 主线程 结束...");
    }
}
console 打印结果:
main 主线程 开始...
subThread 子线程沉睡 3 秒
subThread 子线程沉睡 3 秒结束
main 主线程 结束...
可以看到,由于让 subThread 这个子线程 join() 后,main 主线程 会等 subThread 这个子线程结束后才会结束。
注意点
当时学 join() 陷入了一个困惑,就是没弄明白 wait() ,要记得:
谁执行的 wait() 代码,谁进入等待!同理:谁执行的 join() 代码,谁进入等待!
比如:
Thread b = new Thread();
b.wait();
表示调用 b.wait () 这句代码的线程加入等待队列,即:并不是 b 线程进入等待,而是调用这句话的线程进入等待。
join() 源码分析
public final void join() throws InterruptedException {
    join(0);
}

public final synchronized void join(long millis) throws InterruptedException {
    long base = System.currentTimeMillis();
    long now = 0;

    if (millis < 0) {
        throw new IllegalArgumentException("timeout value is negative");
    }

    if (millis == 0) {
        while (isAlive()) {
            wait(0);
        }
    } else {
        while (isAlive()) {
            long delay = millis - now;
            if (delay <= 0) {
                break;
            }
            wait(delay);
            now = System.currentTimeMillis() - base;
        }
    }
}
join() 转调用了 join(0),所以我们重点关注一下代码:
while (isAlive()) {
  wait(0);
}
可以看,只要 subThread 还活着,就一直循环调用了 wait(0) , wait 方法呢要放入同步代码块中执行,所以可以看到 join(long millis) 使用 synchronized 修饰的:public final synchronized void join(long millis) 。
既然是给成员方法中添加 synchronized 修饰,说明就是 synchronized(this) ,也就是锁住当前实例对象。
我们拿上面的 JoinDemo 例子来说, subThread.join(); synchronized(this) 其实就锁定的是 subThread 对象,谁锁的它呢?我们在 main 主线程 中执行的 subThread.join(); 也就是说,main 主线程 持有了 subThread 这个对象的锁,所以是:main 主线程进入等待,等待 subThread 线程执行完成!subThread 执行完成后,main 主线程才继续执行!
Tip
小提示:
wait、notify、notifyAll 我们一般是搭配使用,上面的 join() 转调用了 wait(),而却没找到 notify 代码,那么最后谁唤醒了它?
实际是 JVM 底层去唤醒的,lock.notify_all(thread); 这里会唤醒持有 thread 这个对象锁的线程。
所以上述例子中,JVM 最后会唤醒 main 主线程。
自行用 wait() 实现 join()
分析了 join() 源码后,发现 join() 其实就是用 wait() 实现的,那么我们可以转换一下代码实现:
public class JoinDemoWithWait {
    public static void main(String[] args) {
        System.out.println("main 主线程 开始...");
        Thread subThread = new Thread(() -> {
            System.out.println("subThread 子线程沉睡 3 秒");
            try {
                TimeUnit.SECONDS.sleep(3);
            } catch (InterruptedException e) {
                throw new RuntimeException(e);
            }
            System.out.println("subThread 子线程沉睡 3 秒结束");
        });
        subThread.start();
        try {
            // subThread.join 替换为以下代码即可
            synchronized (subThread) {
                subThread.wait();
            }
        } catch (InterruptedException e) {
            throw new RuntimeException(e);
        }
        System.out.println("main 主线程 结束...");
    }
}
没错,我们只需要将 subThread.join(); 一行代码替换为下面这 3 行,就实现了 join~
synchronized(subThread) {
    subThread.wait();
}
如果不理解,参考一下前面说的 注意点 ⚠️⚠️
线程主要属性
线程编号 ID:类型 long,用于标识不同的线程,编号唯一性只存在 java 虚拟机的一次运行有效。
线程名称 Name:类型 String,默认 Thread - 线程编号,设置该属性有助于线程调试和问题定位。
线程类别 Daemon:类型 boolean,值为 true 表示该线程为守护线程,否则为用户线程,默认值与相应线程的父线程该属性值相同,该属性必须在线程启动前设置!否则会报错。(一般不建议设置)
优先级 Priority:类型 int,该属性本质上是给线程调度器的提示,用于表示应用程序那个线程优先运行。java 定义了 1~10 的 10 个优先级别。默认值为 5(普通优先级别)。对应一个具体的线程而言,优先级别的默认值与父线程相同。(一般不建议设置,各操作系统的优先级处理都不一样)
守护线程和普通线程没有什么其他区别,主要是守护线程不会影响 JVM 的退出,但是用户线程会。
Java 线程未捕获异常处理 UncaughtExceptionHandler
多线程中的 run 方法不能抛出异常,如果运行时发生异常,线程会停止运行,状态变成 Terminated。
比如下面这段代码:
public class UncaughtExceptionDemo implements Runnable {

    @Override
    public void run() {
        throw new RuntimeException();
    }

    public static void main(String[] args) throws InterruptedException {
        UncaughtExceptionDemo demo = new UncaughtExceptionDemo();
        new Thread(demo, "ttttt-1").start();
        Thread.sleep(120);
        new Thread(demo, "ttttt-2").start();
        Thread.sleep(120);
        new Thread(demo, "ttttt-3").start();
        Thread.sleep(120);
        new Thread(demo, "ttttt-4").start();
    }

}
控制台的结果:
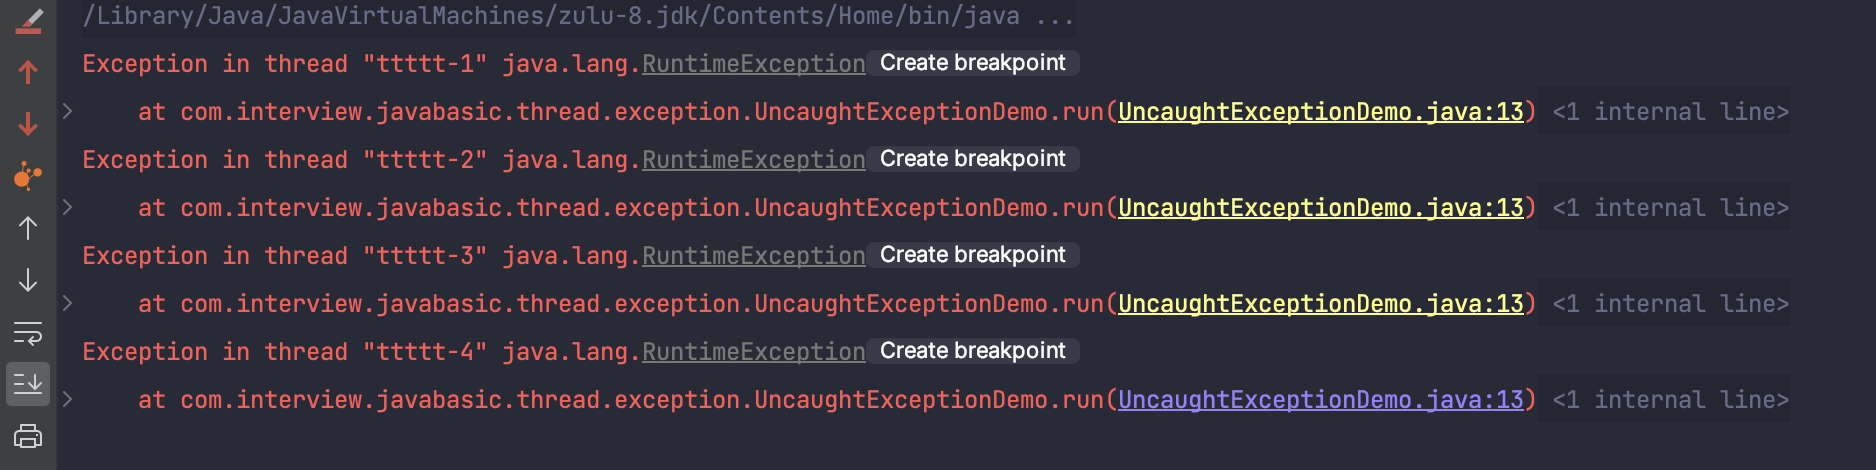
可以正常看到异常错误信息!
我们现在调整一下代码,用 try-catch 包裹,如下:
public class UncaughtExceptionDemo implements Runnable {

    @Override
    public void run() {
        throw new RuntimeException();
    }

    public static void main(String[] args) throws InterruptedException {
        UncaughtExceptionDemo demo = new UncaughtExceptionDemo();
        try {
            new Thread(demo, "ttttt-1").start();
            Thread.sleep(120);
            new Thread(demo, "ttttt-2").start();
            Thread.sleep(120);
            new Thread(demo, "ttttt-3").start();
            Thread.sleep(120);
            new Thread(demo, "ttttt-4").start();
        } catch (InterruptedException e) {
            System.out.println("i got it, caught exception...");
        }
    }

}
执行后,你会发现,控制台输出信息和没改造之前一样,而且并没有打印出 i got it, caught exception..!
方案一:我们可以在 run 方法里直接用 try-catch 包裹.
方案二:使用 UncaughtExceptionHandler
自定义 UncaughtExceptionHandler
先自定义一个 MyUncaughtExceptionHandler 类,实现 Thread.UncaughtExceptionHandler 接口
public class MyUncaughtExceptionHandler implements Thread.UncaughtExceptionHandler {

    private String name;

    public MyUncaughtExceptionHandler(String name) {
        this.name = name;
    }

    @Override
    public void uncaughtException(Thread t, Throwable e) {
        System.out.println(t.getName() + " 线程出异常啦!");
        System.out.println(name + " 捕获到了这个异常: ");
        e.printStackTrace();
    }
}
运行前设置线程的默认 UncaughtExceptionHandler 为 MyUncaughtExceptionHandler
public class UseMyUncaughtExceptionHandler implements Runnable {

    @Override
    public void run() {
        throw new RuntimeException();
    }

    public static void main(String[] args) throws InterruptedException {
      // 设置使用 MyUncaughtExceptionHandler
      Thread.setDefaultUncaughtExceptionHandler(new MyUncaughtExceptionHandler("MyUncaught 抓抓"));
        UncaughtExceptionDemo demo = new UncaughtExceptionDemo();
        new Thread(demo, "ttttt-1").start();
        Thread.sleep(120);
        new Thread(demo, "ttttt-2").start();
        Thread.sleep(120);
        new Thread(demo, "ttttt-3").start();
        Thread.sleep(120);
        new Thread(demo, "ttttt-4").start();
    }

}
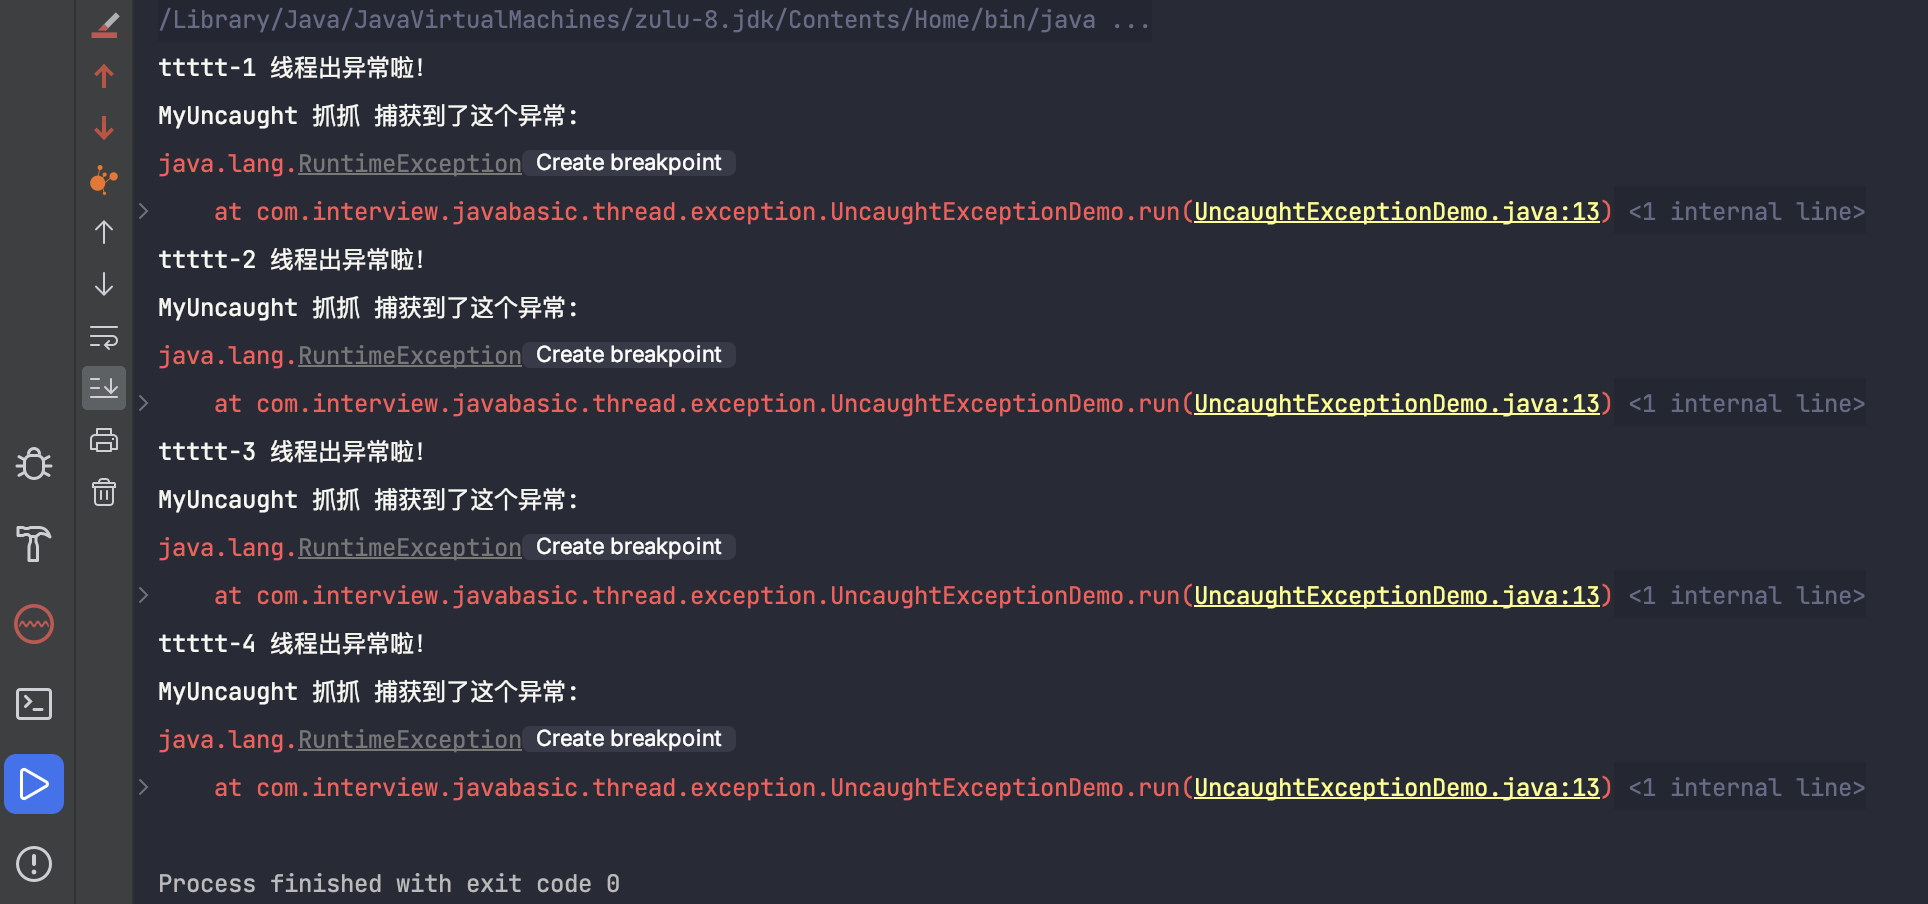
控制台的结果:
UncaughtExceptionHandler 处理策略
代码位置:java.lang.ThreadGroup#uncaughtException
public void uncaughtException(Thread t, Throwable e) {
    if (parent != null) {
        parent.uncaughtException(t, e);
    } else {
        Thread.UncaughtExceptionHandler ueh =
            Thread.getDefaultUncaughtExceptionHandler();
        if (ueh != null) {
            ueh.uncaughtException(t, e);
        } else if (!(e instanceof ThreadDeath)) {
            System.err.print("Exception in thread \""
                             + t.getName() + "\" ");
            e.printStackTrace(System.err);
        }
    }
}
- 如果 parent 不为空,优先使用 parent 的处理
- parent 没有设置处理器,则获取 Thread 默认的处理器
- 若默认设置的处理器不为空,则使用
- 若默认设置的处理器也为空,则打印异常栈信息
多线程是否影响性能?
会影响,主要是:
线程调度:上下文切换
线程协作:内存同步